


For those wishing to install the Triumph Fog/Auxiliary lights, there is an excellent walk through posted on ADVrider that is much better than the factory instructions:
http://www.advrider.com/forums/showpost.php?p=16984390&postcount=252
This is a How-To for the OEM Triumph fog light kit, p/n A9838003 at your friendly Triumph dealer. The instructions that Triumph put together are pretty good but hopefully this photo tutorial will help someone out as they're working on this job. It's not a technically difficult installation but it does take some time. Also, a caveat: installing these lights will add a few steps every time you need to take the tank off from here on out.
Even if you're not installing the fog lights, this should be helpful in learning how to remove the tank.
Tools you will need for this job:
3/8" drive ratchet with various extensions
5mm Allen socket
8mm socket
10mm wrench
12mm socket
2.5mm allen key
Snips (for the zip-ties)
Torx T30 socket or driver
Drill and a 12mm or 7/16" bit
Torque wrench
First up, put your key in the lock under the taillight and remove both the passenger and rider's seats.
Triumph says to disconnect the battery so do that if you want. Since the fog lights are on a switched circuit and won't operate unless the key is on, I didn't bother.
Now you gotta start removing all the plastic crap in order to get the tank off. I thought in going to the Tiger 800 from the 1050 I'd be reducing the amount of plastic crap that has to come off to remove the tank, but it turns out it's about the same.
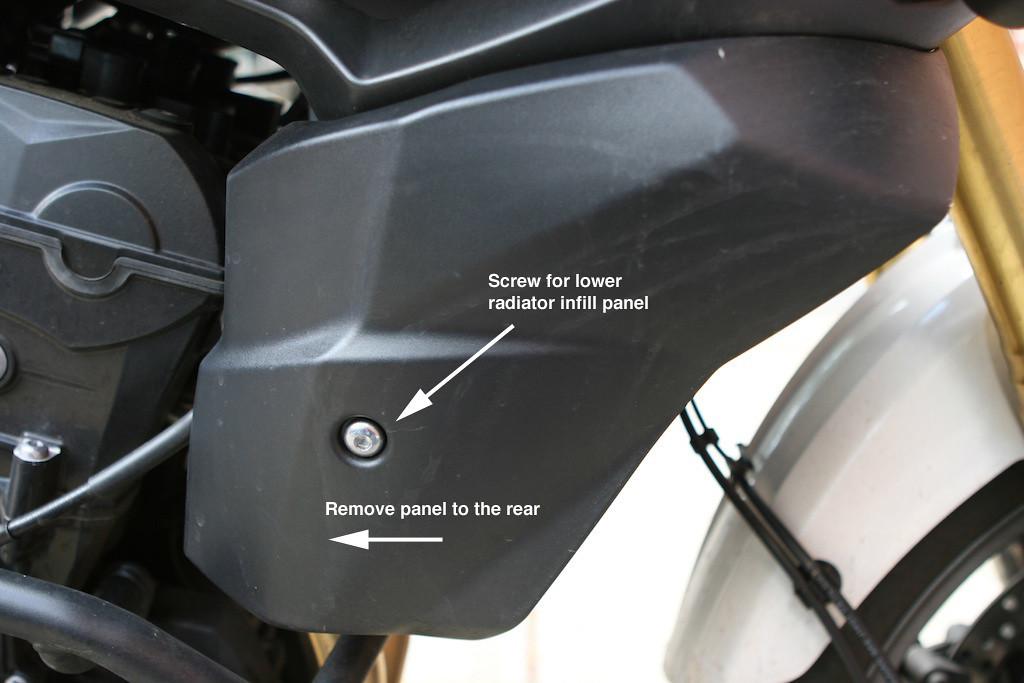
First, get behind the front wheel and remove the two screws in each of the plastic panels on either side of the radiator. Triumph calls these the lower radiator infill panels.
Next remove the single screw on the side of that panel, then pull the panel to the rear to remove it. Set it aside where you won't step on it.
Now you have to remove the "upper radiator panels" which are the black plastic panels on the side of the tank. Get behind the front wheel again and find the screws (one per side) in the backside of the panel. It's about even with the lower triple clamp. You will probably have to turn the forks to get room to get your socket in there.
Then find the other screw on the panel, remove it, and lift the panel up a bit to disengage it from the tabs on the tank.
Now the only thing holding the panel on is the turn signal wiring, so pull the plugs apart and then set the panel aside. Repeat for the other side.
Next you need to remove the cockpit panel. This is the plastic bit that goes from under the headlight back under the bars to the top of the tank. There are two screws to undo at the rear:
Then two screws at the front, just under the headlight. The screws under the headlight have nuts on the back of them so get a 10mm wrench in there to undo the screws.
Then you gently pull the rear edges apart to disengage a tab that fits under the piece of trim behind the ignition switch. Then the whole panel slides off the bike toward the front. Set it aside.
Now you've got this:
Next you need to remove the fuel tank infill panels (the ones that say 800 on them). There is a single screw for each one, located near the battery.
Then just slide the panel to the rear to remove it. Set both panels aside.
Now you undo the two bolts that secure the fuel tank to the frame. They are located on the sides of the fuel tank and have 12mm heads. Remove the bolts and set them aside.
Now you want to ease the fuel tank to the rear a bit, then tilt it upward at the rear so you can access the fuel and electrical connections on the bottom of the tank. First pull off the vent hoses. There are two, right next to each other. They are different sizes so you don't have to worry about them getting mixed up later.
Next you need to remove the fuel and electrical connectors. The fuel connector is a quick-release type. There is an orange safety lock on the connector which you have to slide out of the way. That then exposes the two squeeze tabs on the black part of the connector. Squeeze those together and slide the black part off the spigot. Some fuel will dribble out of the hose but the spigot from the tank is self-sealing. Also undo the two electrical connectors, one black and one orange (one is power for the fuel pump, one is for the fuel gauge). Just squeeze the end of the connectors and pull down.
Now carefully pull the tank to the rear to disengage it from the lugs on the frame, then lift it off the bike and set it down somewhere on a soft surface where it won't get scratched. Dropping it would be a roughly $900 mistake, so be careful.
Now you're looking at this:
Now we get into the kit. Dig out the fog light switch and the switch bracket, then use the tiny allen screws to secure the bracket to the switch, like so:
Remove the bolts that clamp the clutch lever to the bar. Don't let the mirror fall to the ground! If you had the stock allen bolts there, you will be replacing them with new bolts from the kit. If you already had the heated grips, as I did, you don't need the hardware included with the kit. Install the spacers, switch bracket, and new bolts from the kit. It should go like this, from the bar out:
Mirror mount -> spacers -> fog light switch bracket -> heated grip switch bracket (if you have it) -> bolts. Then tighten up the bolts (top one first). Should look like this:
Run the cable from the fog light switch down and to the right, following the clutch cable. The connector at the end should end up in the area of the right side of the radiator.
Grab the relay and the sub-harness from the fog light kit. Put the relay into its connector on the sub-harness (it only fits one of them). That connector has a rubber surround to mount the relay. Put that on the little plastic tang on the side of the radiator. Like so:
Then connect the switch harness to the sub-harness.
Now you want to route the remaining three connectors (one for each fog light and one for the main harness) up around the front of the expansion tank, then through the hole in the frame to the area behind the headstock. I found I had to loosen up the bolts for the expansion tank a bit to get the plugs through the hole in the frame. If you do that, don't tighten them much, you don't want to crack the expansion tank.
Once you do that, find the connector on the main harness for the fog lights. Should be on the left side in the area behind the headstock. It may or may not have a blanking plug on it. The instructions said it should but mine did not. It's this guy:
Connect the sub-harness to that, then route the two ends that go to the fog lights up and forward so that they will come out forward of the tank when it's reinstalled.
Go back down to the relay and zip-tie everything up nice and snug so that you'll be able to get that lower panel on later. Like this:
Now go put the tank back on, reconnect the fuel, electrical, and vents. Don't put on any of the plastic stuff yet.
They don't tell you this in the instructions, but you've got to remove that plastic bit to the rear of the ignition switch in order to correctly route the cables to the fog lights. So go remove that, there are only 2 screws:
The panel just lifts up to remove.
Route the fog light cables around the bracket for that panel, then down along the seam on the tank and under that bracket at the bottom. Zip-tie the cable to that top bracket. Like this:
Then re-install that trim piece that you just removed.
Now grab the cockpit panel and drill out those two front holes (the ones for the screws that are under the headlight) to 12mm. I wasn't able to easily find a 12mm drill bit but the local AutoZone had 7/16" which is close enough. It's only about four hundredths of an inch difference.
Re-install the cockpit panel, slipping two of the flanged sleeves from the kit in between the cockpit panel and the subframe where it mounts. Tricky to line it all up and keep them from falling out while you do it. Make sure after you re-install the cockpit panel that you have not trapped the leads from the sub-harness between it and the tank.
Now remove the lower screw from the windshield mounting bracket. This is a Torx T30 screw. Repeat for the other side.
Take the remaining two flanged sleeves and insert them to the outside of the enlarged front holes in the cockpit panel. Like so:
Now you install the fog light brackets from the kit to the side of the bike. The top bracket mounting point is the lower windshield screw you just removed and the lower mounting point is through the flanged sleeves and the cockpit panel. Use the new hardware from the kit in both spots but re-use the original nuts on the back of the lower mounting point.
Now dig out the shrouds and fog lights. Put a grommet over each of the leads from the fog lights, then fit the grommets through the appropriate holes in the shrouds. Then attach the shrouds to the brackets using the hardware in the kit. Try to get the shrouds as horizontal as possible, then tighten up the two screws holding the shrouds to the brackets.
Then use the four remaining small allen screws and washers to mount the fog lights to the shrouds. Again they are adjustable for left-to-right, so try to get them as centered as possible.
Route the leads from the fog lights through the holes in the brackets, around the cockpit shroud and down under the front tank brackets to join the connectors from the sub-harness. Pull all the slack through, then connect the leads and zip-tie the cables to the tank bracket. Like this:
The connectors will tuck away behind the upper radiator panels when you re-install them.
Now is a good time to test and make sure they work before you finish putting everything back together. If all is well, then put everything back together in the following order:
1) Re-install the fuel tank hold-down bolts and torque them to 12Nm.
2) Re-install the rear screws for the cockpit panel if you haven't done so already.
3) Re-install the fuel tank infill panels.
4) Re-install the upper radiator panels - don't forget to re-connect the turn signals.
5) Re-install the lower radiator panels.
6) Zip-tie the switch harness to the clutch cable at various points along the way with your remaining zip-ties.
That should be everything. If you have parts left over, figure out what you forgot.
You should have left over the original screws for the clutch lever/mirror mount; the original screws for the lower windshield bracket mount, and the original front screws for the cockpit panel. Save all that stuff in case you ever want to un-install the fog lights.
Boom, ya got fog lights!
Next step is to get them aimed properly.
I count about 3 adjustment points.
http://www.advrider.com/forums/showpost.php?p=16984390&postcount=252
This is a How-To for the OEM Triumph fog light kit, p/n A9838003 at your friendly Triumph dealer. The instructions that Triumph put together are pretty good but hopefully this photo tutorial will help someone out as they're working on this job. It's not a technically difficult installation but it does take some time. Also, a caveat: installing these lights will add a few steps every time you need to take the tank off from here on out.
Even if you're not installing the fog lights, this should be helpful in learning how to remove the tank.
Tools you will need for this job:
3/8" drive ratchet with various extensions
5mm Allen socket
8mm socket
10mm wrench
12mm socket
2.5mm allen key
Snips (for the zip-ties)
Torx T30 socket or driver
Drill and a 12mm or 7/16" bit
Torque wrench
First up, put your key in the lock under the taillight and remove both the passenger and rider's seats.
Triumph says to disconnect the battery so do that if you want. Since the fog lights are on a switched circuit and won't operate unless the key is on, I didn't bother.
Now you gotta start removing all the plastic crap in order to get the tank off. I thought in going to the Tiger 800 from the 1050 I'd be reducing the amount of plastic crap that has to come off to remove the tank, but it turns out it's about the same.
First, get behind the front wheel and remove the two screws in each of the plastic panels on either side of the radiator. Triumph calls these the lower radiator infill panels.
Next remove the single screw on the side of that panel, then pull the panel to the rear to remove it. Set it aside where you won't step on it.
Now you have to remove the "upper radiator panels" which are the black plastic panels on the side of the tank. Get behind the front wheel again and find the screws (one per side) in the backside of the panel. It's about even with the lower triple clamp. You will probably have to turn the forks to get room to get your socket in there.
Then find the other screw on the panel, remove it, and lift the panel up a bit to disengage it from the tabs on the tank.
Now the only thing holding the panel on is the turn signal wiring, so pull the plugs apart and then set the panel aside. Repeat for the other side.
Next you need to remove the cockpit panel. This is the plastic bit that goes from under the headlight back under the bars to the top of the tank. There are two screws to undo at the rear:
Then two screws at the front, just under the headlight. The screws under the headlight have nuts on the back of them so get a 10mm wrench in there to undo the screws.
Then you gently pull the rear edges apart to disengage a tab that fits under the piece of trim behind the ignition switch. Then the whole panel slides off the bike toward the front. Set it aside.
Now you've got this:
Next you need to remove the fuel tank infill panels (the ones that say 800 on them). There is a single screw for each one, located near the battery.
Then just slide the panel to the rear to remove it. Set both panels aside.
Now you undo the two bolts that secure the fuel tank to the frame. They are located on the sides of the fuel tank and have 12mm heads. Remove the bolts and set them aside.
Now you want to ease the fuel tank to the rear a bit, then tilt it upward at the rear so you can access the fuel and electrical connections on the bottom of the tank. First pull off the vent hoses. There are two, right next to each other. They are different sizes so you don't have to worry about them getting mixed up later.
Next you need to remove the fuel and electrical connectors. The fuel connector is a quick-release type. There is an orange safety lock on the connector which you have to slide out of the way. That then exposes the two squeeze tabs on the black part of the connector. Squeeze those together and slide the black part off the spigot. Some fuel will dribble out of the hose but the spigot from the tank is self-sealing. Also undo the two electrical connectors, one black and one orange (one is power for the fuel pump, one is for the fuel gauge). Just squeeze the end of the connectors and pull down.
Now carefully pull the tank to the rear to disengage it from the lugs on the frame, then lift it off the bike and set it down somewhere on a soft surface where it won't get scratched. Dropping it would be a roughly $900 mistake, so be careful.
Now you're looking at this:
Now we get into the kit. Dig out the fog light switch and the switch bracket, then use the tiny allen screws to secure the bracket to the switch, like so:
Remove the bolts that clamp the clutch lever to the bar. Don't let the mirror fall to the ground! If you had the stock allen bolts there, you will be replacing them with new bolts from the kit. If you already had the heated grips, as I did, you don't need the hardware included with the kit. Install the spacers, switch bracket, and new bolts from the kit. It should go like this, from the bar out:
Mirror mount -> spacers -> fog light switch bracket -> heated grip switch bracket (if you have it) -> bolts. Then tighten up the bolts (top one first). Should look like this:
Run the cable from the fog light switch down and to the right, following the clutch cable. The connector at the end should end up in the area of the right side of the radiator.
Grab the relay and the sub-harness from the fog light kit. Put the relay into its connector on the sub-harness (it only fits one of them). That connector has a rubber surround to mount the relay. Put that on the little plastic tang on the side of the radiator. Like so:
Then connect the switch harness to the sub-harness.
Now you want to route the remaining three connectors (one for each fog light and one for the main harness) up around the front of the expansion tank, then through the hole in the frame to the area behind the headstock. I found I had to loosen up the bolts for the expansion tank a bit to get the plugs through the hole in the frame. If you do that, don't tighten them much, you don't want to crack the expansion tank.
Once you do that, find the connector on the main harness for the fog lights. Should be on the left side in the area behind the headstock. It may or may not have a blanking plug on it. The instructions said it should but mine did not. It's this guy:
Connect the sub-harness to that, then route the two ends that go to the fog lights up and forward so that they will come out forward of the tank when it's reinstalled.
Go back down to the relay and zip-tie everything up nice and snug so that you'll be able to get that lower panel on later. Like this:
Now go put the tank back on, reconnect the fuel, electrical, and vents. Don't put on any of the plastic stuff yet.
They don't tell you this in the instructions, but you've got to remove that plastic bit to the rear of the ignition switch in order to correctly route the cables to the fog lights. So go remove that, there are only 2 screws:
The panel just lifts up to remove.
Route the fog light cables around the bracket for that panel, then down along the seam on the tank and under that bracket at the bottom. Zip-tie the cable to that top bracket. Like this:
Then re-install that trim piece that you just removed.
Now grab the cockpit panel and drill out those two front holes (the ones for the screws that are under the headlight) to 12mm. I wasn't able to easily find a 12mm drill bit but the local AutoZone had 7/16" which is close enough. It's only about four hundredths of an inch difference.
Re-install the cockpit panel, slipping two of the flanged sleeves from the kit in between the cockpit panel and the subframe where it mounts. Tricky to line it all up and keep them from falling out while you do it. Make sure after you re-install the cockpit panel that you have not trapped the leads from the sub-harness between it and the tank.
Now remove the lower screw from the windshield mounting bracket. This is a Torx T30 screw. Repeat for the other side.
Take the remaining two flanged sleeves and insert them to the outside of the enlarged front holes in the cockpit panel. Like so:
Now you install the fog light brackets from the kit to the side of the bike. The top bracket mounting point is the lower windshield screw you just removed and the lower mounting point is through the flanged sleeves and the cockpit panel. Use the new hardware from the kit in both spots but re-use the original nuts on the back of the lower mounting point.
Now dig out the shrouds and fog lights. Put a grommet over each of the leads from the fog lights, then fit the grommets through the appropriate holes in the shrouds. Then attach the shrouds to the brackets using the hardware in the kit. Try to get the shrouds as horizontal as possible, then tighten up the two screws holding the shrouds to the brackets.
Then use the four remaining small allen screws and washers to mount the fog lights to the shrouds. Again they are adjustable for left-to-right, so try to get them as centered as possible.
Route the leads from the fog lights through the holes in the brackets, around the cockpit shroud and down under the front tank brackets to join the connectors from the sub-harness. Pull all the slack through, then connect the leads and zip-tie the cables to the tank bracket. Like this:
The connectors will tuck away behind the upper radiator panels when you re-install them.
Now is a good time to test and make sure they work before you finish putting everything back together. If all is well, then put everything back together in the following order:
1) Re-install the fuel tank hold-down bolts and torque them to 12Nm.
2) Re-install the rear screws for the cockpit panel if you haven't done so already.
3) Re-install the fuel tank infill panels.
4) Re-install the upper radiator panels - don't forget to re-connect the turn signals.
5) Re-install the lower radiator panels.
6) Zip-tie the switch harness to the clutch cable at various points along the way with your remaining zip-ties.
That should be everything. If you have parts left over, figure out what you forgot.
You should have left over the original screws for the clutch lever/mirror mount; the original screws for the lower windshield bracket mount, and the original front screws for the cockpit panel. Save all that stuff in case you ever want to un-install the fog lights.
Boom, ya got fog lights!
Next step is to get them aimed properly.
I count about 3 adjustment points.
Last edited: