Restoring & Modifying 1971 OIF TR120

Triumph Motorcycle Forum - TriumphTalk

Help Support Triumph Motorcycle Forum:

This site may earn a commission from merchant affiliate links, including eBay, Amazon, and others.
I don't think it hurts to share a bit of our personal lives - and I know you weren't looking for sympathy.
But this is a friendly forum, so it was natural for many to just be kind.
For example, CarlS and I have been members here for 15-16 years and we know a bit about our own private lives.
It's the kind of long-distance friendship that develops over the years.

You are clearly a man of words, and I enjoyed reading your message above TUP
Very well stated, Rocky. TUP
 
All rightee then...

It warmed up to to 50 F. today, so I scurried out to the garage and tried welding the coped test pieces I made up from DOM 1/8" wall (11 gauge) tubing. Turned out acceptably well, as I couldn't break the weld with my longest prying lever.

So, I went ahead and welded on the aftermarket kickstand. It was difficult to get in there with the engine in place, but I don't think it's coming off ever again.

The stumpy 'internal spring' lever is about 3/4" too short, as you can see; it's designed for Harley choppers with rigid or limited travel rear ends. When you get off the Bonny, the front shocks elongate and it leans over too far as shown in the first of the lean angle shots. So, I'll refit the exhaust pipe this weekend, bend up an extension, trim the aftermarket job and replace the last few inches.

I want the exhaust pipe in place, so I can rotate the extension around it's long axis and get the bend to the optimum balance of tucked up close to the exhaust, while mating the 'foot' with the ground to lengthen the contact point so it doesn't sink into softer ground.

Can't wait to get around to tuning those Mikunis with Speedrattle's tips!
 

Attachments

  • new sidestand(2).jpeg
    new sidestand(2).jpeg
    229.9 KB · Views: 34
  • new sidestand(3).jpeg
    new sidestand(3).jpeg
    346.1 KB · Views: 31
  • new sidestand(4).jpeg
    new sidestand(4).jpeg
    342.3 KB · Views: 29
  • new sidestand(5).jpeg
    new sidestand(5).jpeg
    281.8 KB · Views: 29
  • new sidestand(1).jpeg
    new sidestand(1).jpeg
    220.6 KB · Views: 38
So, took some fiddling but made some templates for the side covers, transferred them to a sacrificial (and too thick) piece of aluminum, made the bends, and adjusted things a bit. Made finished templates, cut them out with the saber saw (duct tape on the foot to avoid deep scratches), and looks like they'll fit well.

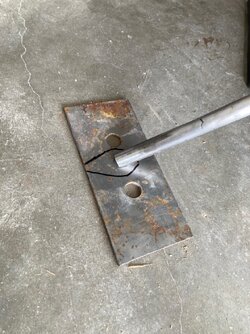
I then made up a little die with some hard maple I had laying around and a forstner bit, and pressed an indentation with a socket into the extra piece of aluminum I bought for experimentation... and voila. There will be a nice recess for the ignition switch's bezel to nestle into.

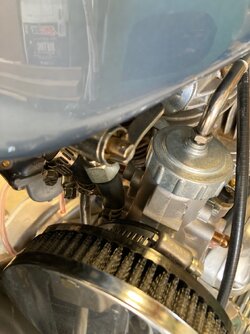
I had wanted to make an oblong recess in each cover, into which to put the waterslide decals (over white paint along the bottom of the recess), but the Bonneville script is too long to fit onto the flat, rearward area of the cover before the gentle radius that follows the frame tube and seat profile. So, I may just put a stripe along the covers--white with a pinstripe to match the tank and fender color--and lay the water slide over that, straddling the large, gentle radius. Then, polish up the balance of the covers to a mirror finish and throw some clear coat on top. Should look cool with the K&N filters...
I have to admit that I did always rather like the original side panels, although many were junked and replaced with older style ones. The original passenger grab rail set the bike off nicely too.
 
Okay, got the internal spring kickstand lengthened (cut off 'L' at bottom > prepare extension > 30-degree bevels to receive fillets > weld > sand smooth). Repair is about 4" from bottom end, turned out very strong.

Then, determined length and cut the angle @ the ground > tested lean angle > made up a 'foot' from 3/16" plate > checked tuck @ pipe.

It actually is up in there tighter than this view angle shows; I'd have to be leaned w-a-y over to contact it.

The lug and lever are very solid; I think this is a permanent repair, and the internal spring looks cool, too.

It's done and painted, hanging in the sun. Should have her back together later today or mañana, then I'll get back to tuning the Mikunis.
 

Attachments

  • new sidestand(6).jpeg
    new sidestand(6).jpeg
    253.4 KB · Views: 31
  • new sidestand(7).jpeg
    new sidestand(7).jpeg
    323.3 KB · Views: 31
  • new sidestand(8).jpeg
    new sidestand(8).jpeg
    369.9 KB · Views: 29
  • new sidestand(9).jpeg
    new sidestand(9).jpeg
    318.7 KB · Views: 26
  • new sidestand(10).jpeg
    new sidestand(10).jpeg
    288.7 KB · Views: 30
Okay, all done! (...and please ignore the dust all over her...)

I was mirroring the lean angle of my $1,500 commuter-mobile, and it's reasonably close. When you're kicking the bike--while standing on the R/H side--it actually 'rolls' around its long axis, taking weight off of the kickstand with each stroke.

But, regardless, that new combo butt & lug is beefy and I think I got good penetration, so... yeah, ready to get her going at long last!
 

Attachments

  • new sidestand(11).jpeg
    new sidestand(11).jpeg
    289.4 KB · Views: 38
  • new sidestand(12).jpeg
    new sidestand(12).jpeg
    490.3 KB · Views: 34
  • new sidestand(13).jpeg
    new sidestand(13).jpeg
    669.8 KB · Views: 33
  • new sidestand(14).jpeg
    new sidestand(14).jpeg
    457.8 KB · Views: 30
Okay, all done! (...and please ignore the dust all over her...)

I was mirroring the lean angle of my $1,500 commuter-mobile, and it's reasonably close. When you're kicking the bike--while standing on the R/H side--it actually 'rolls' around its long axis, taking weight off of the kickstand with each stroke.

But, regardless, that new combo butt & lug is beefy and I think I got good penetration, so... yeah, ready to get her going at long last!
I started to read your journey regarding the Bonneville restoration. Very interesting indeed seeing I'm involved with a 1976 T120 Bonneville project. Keep up the good work and be safe out there.
 
I started to read your journey regarding the Bonneville restoration. Very interesting indeed seeing I'm involved with a 1976 T120 Bonneville project. Keep up the good work and be safe out there.

Glad the thread has been enjoyable and (perhaps) useful to you, too. It started right up, second kick, with the new Mikunis. But I've got the fuel lines routed poorly, so it isn't feeding fuel well. After lunch I'll rectify that, go bed in the disc pads, and see how she handles in the canyon.

Once she's copasetic, I'm heading out for a shakedown cruise with the GoPro fired up--but might have to be next weekend in view of other commitments.

I'll be interested to see your '76 project unfold. Maybe you can link to it...? I was just talking to the machinist who made the Wildwood caliper adapter you see in the photo in post #609 about its possible application to the later bikes. No problem doing that, but since there's a commercially available 11.5" kit offered already that doesn't require lacing one's rim onto the Sporty hub, if I decide to make conversion kits they'll initially be for '71-72 front drum models.
 
I noticed today that the bike is a teensy bit tippy when kick-starting. I may have it too close to vertical--especially if wherever I parked weren't dead level. It's all that suspension travel that makes it hard to settle on the right lever length.

I think what I'll do is ride it around, see if it's disconcerting at all in various locations. Then if it is, it'll be easy-peasy to cut the foot off, remove 1/8" from the lever, and weld the foot back on. The tuck is very nice, however--you can just catch the foot with your boot toe without melting your sole onto the pipe. So, I'd keep the rotational aspect of the foot the same...
 
Success! I still need to stroboscopically time the engine (just did the initial Boyer Bransden static setup), and fiddle with the idle mixture a touch more, but I zipped down the canyon to the gas station for the first tankful of premium and back--and took some photos on the way back up from the Rio Grande.

Here are the pics and a link to a brief video of the idle... yeah, still a bit rough.

First impressions:

- The bike is a breeze to start hot or cold. Cold, just flip the choke levers on the Mikunis and it fires on the second kick. Contrary to what the instructions say, you do need to open the throttle slightly--probably because I'm at 6,000 ft. and it needs a touch more air. But at the gas station, when stopped for pictures, etc., no choke and one kick.

- The bike is quick. I have yet to do Speedrattle's in-depth, jet-tuning exercises (too much traffic this afternoon), but right out of the box MAP Cycle seems to have gotten it fairly close (I did order specifying a Unit 650). I was behind a '60s Chevy pickup coming up the hill toward the canyon, and when the dotted line started, I just rolled it on from what I assume from the rpms was about 50 mph in 4th gear... zzaappp! She just flew around him and into the S-curve. No hesitation or stumbling.

Anyway, thrilled to confirm there's no need to do the top end. It's running great. Oil pressure is very good with the (incredibly cheap) new balls and springs in the OEM pump: the red light goes out instantly and doesn't flicker when idling.

- The DIY 11.5" front disc is excellent. The pads aren't fully bedded in, as there was too much traffic to do the repeated, hard stops required. But even so, it's a two-finger affair--and the modulation is better than I thought it'd be. So, that conversion is a complete success. After the pads are bedded in, I'll strap on the GoPro so folks can see just how quickly it stops.

- The '70s OIF design handles brilliantly. I thought with that relatively long wheelbase and kicked out steering head angle, it'd be maybe a little sluggish... nope. Very precise going through the S-curve, zero wandering over the uneven pavement that starts right before the apex of the first hard lefthand leaner... just really confidence-inspiring.

I'm not yet feeling any skittishness people worried about with this 54-year-old front suspension. Indeed, the long throw isn't a bad thing with NM roads--and it soaked up the washboard on the dirt spur off the two-lane blacktop to my place very nicely. The new Hagon rear shocks are also very good--they're on the light setting out of the box, I think...?

Note on tires: the stock-size Battlax BT46 tires? I recommend them, as I've been riding the same size(?!) on my Beemer for a few thousand miles--and they're great on this bike, too. When I've scuffed them in a bit, I'll add some steam going through the S-curve and see if I can scrape that new kickstand...

- The rear-set shifter is a little awkward. It takes all of 10 minutes of riding to get used to the R/H shift, L/H brake. But as I'd suspected would be the case, the protruding portion of the shift lever is a bit short on downshifts--which of course means toeing upward with the backward-facing lever--when nestling your boot toe against the late-model, folding kickstarter. So, I'll yank the shift lever, cut the end off, weld on an extension, and weld the end back on--then add a second rubber (or part of one) so it looks seamless.

The clutch effort is a little high--though I'm used to the Beemer, which is almost a one-finger clutch due to its l-o-n-g actuating arm on the tranny end. I'll fiddle with the cable routing and make sure I've not chosen a poor path. Just seems excessive....

- The fairing and clip-ons are really nice. I've been running errands on the El Cheapo '84 BMW R100RS I rode back from Wisconsin last October, which has stock handlebars about the same width as these clip-ons(!). So, I found myself not even thinking about the steering through the canyon--with one difference. This bike is much lighter, so you don't really have to muscle it around at all: very light negative steering pressure, and it just falls into the corners.

The riding posture is more aggressive than the Beemer, but again, I will ride it into Albuquerque next weekend and report back after a couple of hours in the saddle (and when I'm not so excited). The flat (new) stock seat is very comfortable, though.

Idle and mufflers.

Now, to get those darned side covers polished, painted, and the decals on... GoPro video when I get a moment!
 

Attachments

  • IMG_4635.jpeg
    IMG_4635.jpeg
    674.9 KB · Views: 29
  • IMG_4637.jpeg
    IMG_4637.jpeg
    403.9 KB · Views: 31
  • IMG_4636.jpeg
    IMG_4636.jpeg
    441.1 KB · Views: 32
  • IMG_4634.jpeg
    IMG_4634.jpeg
    605.8 KB · Views: 33
Oh forgot... here is what I had to do with the fuel lines, due to the MIkunis' inlet location. There are very fine screens on the petcocks inside the tank--and the bowls come off these carbs easily--so I'm not worried about filtering...
 

Attachments

  • IMG_4639.jpeg
    IMG_4639.jpeg
    298.4 KB · Views: 29
  • IMG_4640.jpeg
    IMG_4640.jpeg
    222.4 KB · Views: 29
Checked the plugs (NGK BR8ES), and they look pretty good.

Also, got out the welder and extended the shifter peg 1/2", which is precisely the distance lost from using the late model, folding kickstarter. I sliced the flare off the outboard end of the rubber, and have another on the way, which will lose its inboard end. Should look fine, and that will be the end of the awkward shifting...

Finally, I was delighted to learn that there's room for a clip to hold my front brake disc lock under the seat. I set the clip-ons so that the steering head lock just engages at full L/H, so together with the front disc locked, I'll feel much better about running errands or having a meal without being able to see the bike.

I've got those semicircular pieces of steel from the new alternator rotor, so perhaps I can use one of those to make up the clip...
 

Attachments

  • IMG_4645.jpeg
    IMG_4645.jpeg
    186.9 KB · Views: 29
  • IMG_4649.jpeg
    IMG_4649.jpeg
    278.7 KB · Views: 26
  • IMG_4651.jpeg
    IMG_4651.jpeg
    253.4 KB · Views: 29
Last edited:
kickstand
The photos in your #609 post concern me - extended, the "foot" appears to be ahead of the pivot? If yes, you know if you ever forget to retract it, it will tip the bike over at the first left hand bend?

Happened to friends - in their case, the rider had retracted the stand but its spring broke as the bike approached a left hand bend; as we ride/drive on the left, both rider and pillion hospitalised with serious injuries as the stand tipped the bike over in front of an oncoming car. :(

Currently restoring a Honda 125 for my daughter (learners are restricted to 125 cc until they pass the first two tests towards a motorcycle licence). Although when deployed, its kickstand foot does not go further forward than the pivot, I have replaced the original kickstand with one from a 1980-on Superdream - these mount a wedge shaped rubber beside the foot: no weight on the kickstand, the thin end of the wedge extends below the kickstand foot, bike moving, that hits the road surface first, flips the stand up before anything solid hits the surface; weight on the kickstand, the thin end of the wedge bends until the foot reaches the road surface. (y)

speedo
online pamphlets for these gauges?
There are posts in various forums. Never tried it myself as all say the hardest part is crimping the new bezel neatly. Probably not an issue if you have a lathe and can make a suitable tool but, as I do not have a lathe ... :( Restoring/servicing speedos and tachos is one of the few jobs I pay an expert.
 
Just power washed this guy after it I picked it up from my late brothers shea couple of years ago It sat there for about 25 years. In my garage waiting for some warmer weather to continue the restoration. Labor of lover for my big brother.
 

Attachments

  • IMG_3995.JPG
    IMG_3995.JPG
    405.3 KB · Views: 30
The photos in your #609 post concern me - extended, the "foot" appears to be ahead of the pivot? If yes, you know if you ever forget to retract it, it will tip the bike over at the first left hand bend?

Happened to friends - in their case, the rider had retracted the stand but its spring broke as the bike approached a left hand bend; as we ride/drive on the left, both rider and pillion hospitalised with serious injuries as the stand tipped the bike over in front of an oncoming car. :(

Currently restoring a Honda 125 for my daughter (learners are restricted to 125 cc until they pass the first two tests towards a motorcycle licence). Although when deployed, its kickstand foot does not go further forward than the pivot, I have replaced the original kickstand with one from a 1980-on Superdream - these mount a wedge shaped rubber beside the foot: no weight on the kickstand, the thin end of the wedge extends below the kickstand foot, bike moving, that hits the road surface first, flips the stand up before anything solid hits the surface; weight on the kickstand, the thin end of the wedge bends until the foot reaches the road surface. (y)


There are posts in various forums. Never tried it myself as all say the hardest part is crimping the new bezel neatly. Probably not an issue if you have a lathe and can make a suitable tool but, as I do not have a lathe ... :( Restoring/servicing speedos and tachos is one of the few jobs I pay an expert.

Kickstand: I appreciate the concern for my safety very much. Having the lever extend forward of the pivot is an innovation numerous manufacturers have done to avoid the bike rolling forward off the kickstand if conditions don't allow a neutral or uphill parking orientation, or if the ground is soft. The Brown kickstand--favored aftermarket on Airhead Beemers like mine--is designed that way, as are others.

You do have to remember to retract the stand--but then I have to remember to remove the front disc lock (which if left on will make the bike tip over when it contacts the fork sliders), too.

My approach to motorcycling is not to become automatic or reflexive, but rather to be mindful and alert. Every time I approach a vintage bike--which all three of mine are--my eyes tend to scan the tires (low pressure), pavement (gas or oil leaks), chain (tensioners and/or axle nut became loose), dangling cables or leads, etc.

Before startup, I always check the oil (unless on a ride where I've already done that), check the gas level, peer at the front and rear axle fasteners--and on a bike like this one or the '51 FL, check to see that I've removed the disc lock and freed the steering head lock. All of that takes just a few seconds, so not inconvenient.

Before heading out, I always check headlamp and brake light operation, check my helmet chin strap--and look down to see if I folded up the kickstand, and if it's staying put.

Speedo: I consulted the almost universally preferred Stewart Warner repair guy after I found the Police Special unit shown in the other thread--and he sold me the only two parts I needed for $10 (his labor is generally $350~$450 depending on model).

I very nearly made up a die to crimp the bezel, but found that it wasn't necessary--once you figure out how to apply pressure to compress the rubber O-ring and steady the unit. Here are a few pics of how I did that. The plastic cup is from some soup the wife had purchased at the store.
 

Attachments

  • Reassembly(26).jpeg
    Reassembly(26).jpeg
    220.5 KB · Views: 26
  • Reassembly(27).jpg
    Reassembly(27).jpg
    270.9 KB · Views: 25
  • Reassembly(28).jpg
    Reassembly(28).jpg
    264.1 KB · Views: 28
  • Reassembly(29).jpg
    Reassembly(29).jpg
    203.1 KB · Views: 28
  • Reassembly(30).jpg
    Reassembly(30).jpg
    270.8 KB · Views: 26
  • Reassembly(31).jpg
    Reassembly(31).jpg
    243.7 KB · Views: 25
  • Reassembly(32).jpg
    Reassembly(32).jpg
    271.3 KB · Views: 25

Latest posts

Back
Top