


Rudy,
*Note: the following relies on your discussion above, re: the fitment of '73-77 sliders on my '71 fork tubes or stanchions: "The stanchion o.d. is the same, the fastening to the bottom of the damper rod is the same." I was laboring under the apparently mistaken impression that they would not fit my stanchions, so I'm thrilled to be wrong.
I see from searching the web that the '73-77 disc-type slider does not have the external rib running down its length, so I'd need both sides to avoid an odd-looking front end. But it otherwise looks very similar, so the overall look of the bike would still be period-correct...
...cool. I have found a pair listed as new (but which look like good used) on eBay for far less than what a single leg sells for on the usual suspect websites--and the seller allows returns in the event I receive them and they're knackered inside. Shipping is very cheap... purchased them! (see 2nd pic)
However, I think what I'll do is ditch the Triumph hub and use the aluminum Sportster hub (I have the axle, too) shown earlier (there's room for it between the slimmer fork tubes). I'd just machine a simple adapter to position the Wilwood aluminum caliper properly to accept the 11.5" Harley-pattern rotor I already have (3rd pic), and which is considerably larger than the '73-77 Triumph rotor (by nearly 2"...?). That would stop the bike very quickly, indeed. All I'd have to do is turn down the Sporty's 3/4" axle at the outer ends to fit the Triumph sliders/retaining caps, and turn some appropriate spacer sleeves to center the hub (same as I did on the '51 FL conversion, plus a few other tricks).
The caliper adapter design would be extremely straightforward: I'd be simply moving a pair of bolt holes out from the axle in a radial dimension a smidge and adjusting the span of the outer set to fit the Wilwood caliper. I think the Performance Machine rotor has a '70s look to it with the five spoke design, and it's quite light.
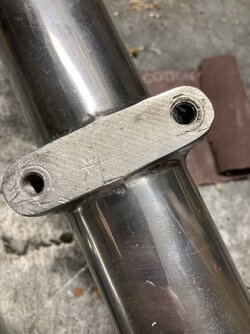
Moreover, if others liked the setup, it'd easy for me to reproduce them inexpensively, as this would be a single setup operation on the big CNC mill. As with my rear disc conversion adapters for the MG Midget and Austin Healey Sprite (see 1st image), anodizing would require sufficient demand for a run of parts to make economic sense, but in a one-off prototype for my bike, just polished or painted would be fine. Polished would look cool with a black caliper...
I will adopt some of Rudy's suggested damper and sealing mods as budget permits.
Best of all, the stock sliders, axle, and conical brake will pay for much if not all of this conversion... er, well, maybe just a good chunk, as I'll now have to spring for those Borrani aluminum rims, SS spokes, and new tires...
Anyway, very exciting! Thanks again gents!
*Note: the following relies on your discussion above, re: the fitment of '73-77 sliders on my '71 fork tubes or stanchions: "The stanchion o.d. is the same, the fastening to the bottom of the damper rod is the same." I was laboring under the apparently mistaken impression that they would not fit my stanchions, so I'm thrilled to be wrong.
I see from searching the web that the '73-77 disc-type slider does not have the external rib running down its length, so I'd need both sides to avoid an odd-looking front end. But it otherwise looks very similar, so the overall look of the bike would still be period-correct...
...cool. I have found a pair listed as new (but which look like good used) on eBay for far less than what a single leg sells for on the usual suspect websites--and the seller allows returns in the event I receive them and they're knackered inside. Shipping is very cheap... purchased them! (see 2nd pic)
However, I think what I'll do is ditch the Triumph hub and use the aluminum Sportster hub (I have the axle, too) shown earlier (there's room for it between the slimmer fork tubes). I'd just machine a simple adapter to position the Wilwood aluminum caliper properly to accept the 11.5" Harley-pattern rotor I already have (3rd pic), and which is considerably larger than the '73-77 Triumph rotor (by nearly 2"...?). That would stop the bike very quickly, indeed. All I'd have to do is turn down the Sporty's 3/4" axle at the outer ends to fit the Triumph sliders/retaining caps, and turn some appropriate spacer sleeves to center the hub (same as I did on the '51 FL conversion, plus a few other tricks).
The caliper adapter design would be extremely straightforward: I'd be simply moving a pair of bolt holes out from the axle in a radial dimension a smidge and adjusting the span of the outer set to fit the Wilwood caliper. I think the Performance Machine rotor has a '70s look to it with the five spoke design, and it's quite light.
Moreover, if others liked the setup, it'd easy for me to reproduce them inexpensively, as this would be a single setup operation on the big CNC mill. As with my rear disc conversion adapters for the MG Midget and Austin Healey Sprite (see 1st image), anodizing would require sufficient demand for a run of parts to make economic sense, but in a one-off prototype for my bike, just polished or painted would be fine. Polished would look cool with a black caliper...
I will adopt some of Rudy's suggested damper and sealing mods as budget permits.
Best of all, the stock sliders, axle, and conical brake will pay for much if not all of this conversion... er, well, maybe just a good chunk, as I'll now have to spring for those Borrani aluminum rims, SS spokes, and new tires...
Anyway, very exciting! Thanks again gents!


 Another back story: when AP were supplying Triumph with Lockheed disc brake bits, Girling was another components supplier to British vehicle makers; however, the only things the original Girling company ever supplied to Meriden were rear suspension units. At some time more recently, Wassell has acquired the rights to the "Girling" name and is using it on its pattern disc brake parts, although the parts are by definition patterns of Lockheed parts. That said, Wassell might be copying the Grimeca version of the Lockheed alloy caliper - the Grimeca version had metric internal dimensions, threads, etc. and aiui the Wassell Girling version does too.
 I did not see your last post until after I had posted my previous one.
") but the T160 is probably(?) 50 lb heavier than a twin. Nevertheless, increased rotor o.d., consider a proper brace between the sliders?
but the T160 is probably(?) 50 lb heavier than a twin. Nevertheless, increased rotor o.d., consider a proper brace between the sliders? ")


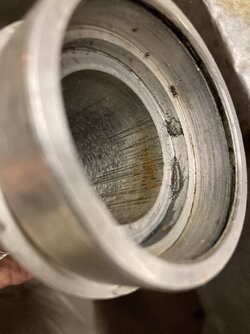
 Also the scratches are vertical, will not retain oil whereas honing marks would?

